IntelliJ IDEA: The Art of Shortcut-Driven Productivity
In the fast-paced world of modern work, efficiency is everything — especially in software development. For me, working in IntelliJ IDEA means leveraging shortcuts to stay productive and focused. Over time, I’ve trained myself to minimize mouse usage, relying almost entirely on keyboard shortcuts to navigate, refactor code, or manage Git workflows. It’s a habit that has transformed how I interact with my tools.
What’s fascinating is how deeply these shortcuts have become embedded in my muscle memory. At this point, I probably use over 100 different shortcuts without even thinking about them. They’re second nature, like riding a bike or tying my shoes. It’s such an automatic process that if someone asked me to explain which shortcut performs a specific action, I might struggle to recall it consciously. Yet, when my fingers are on the keyboard, everything flows seamlessly. It’s like my hands know the language of productivity better than my mind does.
This muscle memory not only makes me faster but also helps maintain focus by keeping me “in the zone.” In this article, I’ll share my experience, favorite shortcuts, and tips to help you unlock the full potential of IntelliJ IDEA and work smarter, not harder.
“Move Statement” vs. “Move Line”
- Move Statement Up/Down (macOS
Cmd + Shift + ↑/↓, Windows/LinuxCtrl+Shift+↑/↓): Context-aware; moves entire code blocks while maintaining structure and syntax. - Move Line Up/Down (macOS
Option + Shift + ↑/↓, Windows/LinuxAlt+Shift+↑/↓): Moves individual lines without context; great for quick, small adjustments.
Use the first one for reorganizing code logically and the second one for making small, precise changes.
Extract to Function
The “Extract to Function” shortcut helps you quickly refactor a selected block of code into a separate function.
- macOS:
Cmd + Option + M - Windows/Linux:
Ctrl + Alt + M
This shortcut improves code readability and organization by turning repetitive or complex code into reusable functions with just a few keystrokes.
IntelliJ IDEA offers multiple extraction options: Function, Variable, and Field.
- Extract Variable (macOS
Cmd + Option + V, Windows/LinuxCtrl + Alt + V): This shortcut lets you quickly create a variable from an expression or value, making your code more readable and easier to maintain. - Extract Field (macOS
Cmd + Option + F, Windows/LinuxCtrl + Alt + Fon Windows/Linux) This is used to create a class field from a variable, especially useful when you need to make a value available throughout the class.
Both shortcuts help refactor code efficiently, improving clarity and reducing repetition.
Rename Functions, Variables, Classes, and Files
Renaming elements like functions, variables, classes, and files is quick and easy with the Rename shortcut.
- macOS:
Shift + F6 - Windows/Linux:
Shift + F6
This shortcut allows you to rename a selected function, variable, class, or file, and IntelliJ IDEA will automatically update all references to it throughout your project, saving you time and preventing errors.

Move to Separate File
In IntelliJ IDEA, you can quickly move a class or file to a separate file using the Move to Separate Filefeature.
- macOS:
F6 - Windows/Linux:
F6
This shortcut allows you to move a class, interface, or enum to its own dedicated file, improving organization and code structure. IntelliJ IDEA will handle the refactoring automatically, ensuring the class name matches the new file name.
Extend/Shrink Selection
The “Extend/Shrink Selection” feature allows you to quickly adjust the scope of your text selection, making it easier to select entire blocks of code or individual components.
- macOS:
Cmd + Shift + Arrow Up/Down(Extend),Cmd + Arrow Up/Down(Shrink) - Windows/Linux:
Ctrl + Shift + Arrow Up/Down(Extend),Ctrl + Arrow Up/Down(Shrink)
With Extend Selection, you can expand your selection one logical step at a time — like selecting a word, then a statement, then a block of code. Conversely, Shrink Selection allows you to reduce the selection, step by step, from a larger block of code to a smaller one.
This shortcut is great for quickly selecting specific sections of code for editing, refactoring, or copying, improving your efficiency without the need for precise manual selection.
Add Selection for Next Occurrence
The “Add Selection for Next Occurrence” feature in IntelliJ IDEA allows you to quickly select and edit multiple occurrences of a word or phrase.
- macOS:
Cmd + G - Windows/Linux:
Ctrl + G
This shortcut highlights the next occurrence of the selected text, allowing you to edit multiple instances simultaneously. It’s great for refactoring or making bulk changes quickly.
-
Unselect Occurrence:
If you want to unselect a highlighted occurrence, simply press
Shift + Cmd + Gon macOS orShift + Ctrl + Gon Windows/Linux to deselect the current selectio , and the cursor will move back to the previous one.
This makes it easy to fine-tune your selection without losing track of the changes you’re making.

Toggle Case
The “Toggle Case” feature in IntelliJ IDEA allows you to quickly switch between uppercase and lowercase for selected text, making text manipulation faster and easier.
- macOS:
Cmd + Shift + U - Windows/Linux:
Ctrl + Shift + U
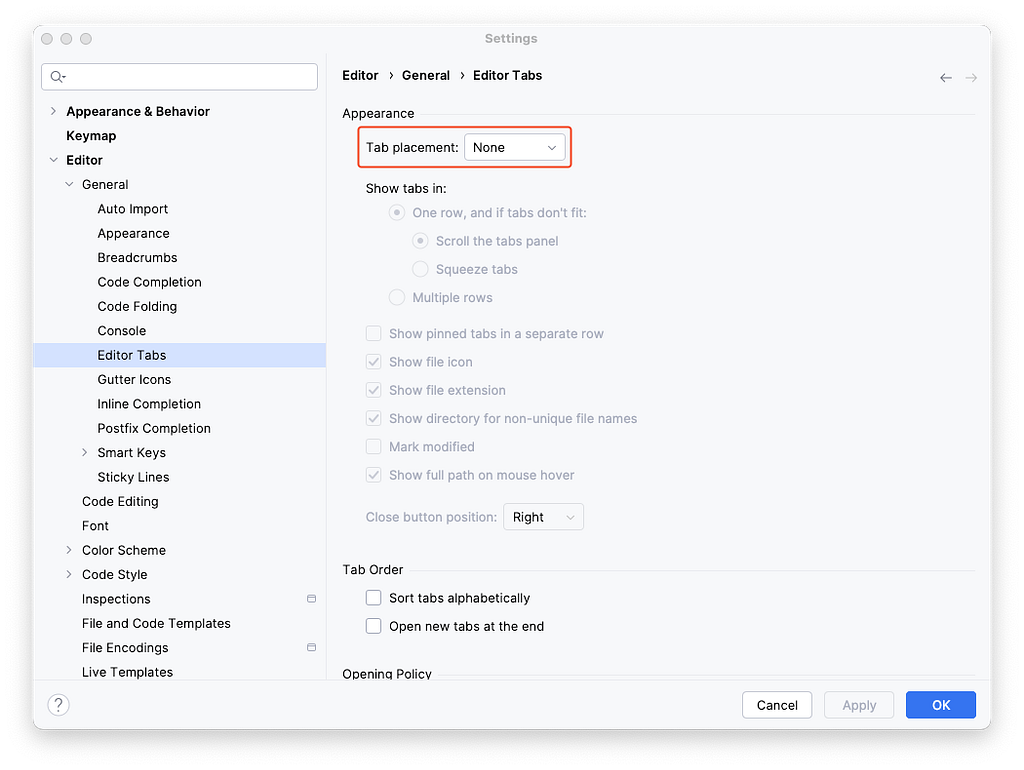
Tabs and My Workflow: A Shift to “Recent Files”
You may have noticed that I don’t use tabs in IntelliJ IDEA. This change was intentional. In the past, I would select the appropriate tab to open a file, but over time, I realized this behavior was slowing me down. I found myself constantly switching between files and wasting time looking for the right tab. To break this habit, I decided to turn off tabs entirely.
Instead, I now rely on the “Recent Files” feature, which allows me to quickly switch between files using the shortcut:
- macOS:
Cmd + E - Windows/Linux:
Ctrl + E
By pressing this shortcut, I can view and navigate to the most recently used files without the distraction of tabs. This practice has helped me stay focused and more efficient by reducing the time spent visually scanning through open files. It’s a simple change that has significantly streamlined my workflow.
Switching Branches
Instead of manually navigating through Git or using the mouse, I use a streamlined shortcut to filter and switch branches:
- macOS:
Cmd + V - Windows/Linux:
Ctrl + V
After pressing the shortcut, I type “br” to filter the list and quickly see all available branches.
- Once I see the list of branches, I select the desired one and press Enter.
- Finally, to checkout the branch, I use the “checkout” command.
This process allows me to switch branches rapidly, saving time and keeping me focused on coding rather than navigating through menus. It’s an efficient, keyboard-driven workflow that helps me stay in the zone while managing my Git branches.

Committing Changes
Here’s my process:
- Open the Commit Window
- macOS: Cmd + K
- Windows/Linux: Ctrl + K
- After opening the commit window, I start writing my commit message.
- Once I’ve written the message, I use the following shortcut to
commit the changes:
- macOS:
Cmd + Enter - Windows/Linux:
Ctrl + Enter
- macOS:
This method allows me to commit my changes with minimal distractions, making the process faster and more streamlined without ever needing to take my hands off the keyboard.
Git commit checks are an excellent way to ensure consistency and quality in your codebase. By using tools like Reformat Code, Rearrange Code and Optimize Imports, you can keep your code clean and standardized.
- Reformat Code enforces a uniform code style based on your project settings.
- Rearrange Code reorganizes elements such as methods and fields according to a predefined order.
- Optimize Imports removes unused imports and organizes them logically.

Pushing a Branch
Here’s how you push a branch:
- macOS:
Cmd + Shift + K- Windows/Linux:
Ctrl + Shift + KThis opens the “Push” dialog, where you can see an overview of the commits on your branch that are ready to be pushed to the remote. It’s a quick and efficient way to keep your branch up to date without needing to manually navigate through menus.
In Commit window, instead of using macOS:
Cmd + Enter, Windows/Linux:Ctrl + Enterto commit and then manually pushing, you can streamline the process by using macOS:Option + P, Windows/Linux:Ctrl + Alt + K. This allows you to commit and immediately push the changes in one step, making the process faster.
Learning from the Best: Hadi Hariri’s Tips and Tricks
My journey to mastering IntelliJ IDEA shortcuts and productivity hacks wouldn’t be complete without mentioning Hadi Hariri. Watching his talks and tutorials has been invaluable in discovering powerful features and techniques I didn’t even know existed. His insights on navigating IntelliJ IDEA efficiently and using its advanced tools have shaped how I work today. If you’re looking to level up your skills, I highly recommend diving into his content — it’s a goldmine for developers aiming to work smarter, not harder.
Conclusion
Mastering shortcuts in IntelliJ IDEA has truly transformed the way I work. By reducing my reliance on the mouse and focusing on keyboard shortcuts, I’ve drastically increased my productivity and efficiency. From navigating between files to committing changes and switching branches, these small tweaks have made a big difference in streamlining my workflow.
What’s most fascinating is how these shortcuts have become second nature to me. They’re embedded in my muscle memory, allowing me to focus on what really matters — writing great code. If you haven’t yet fully embraced the power of shortcuts, I highly encourage you to give them a try. Start small, and gradually integrate more shortcuts into your daily routine. You’ll be surprised at how much time you can save and how it can elevate your coding experience.
Remember, every keystroke that replaces a mouse click brings you closer to a more efficient and productive development environment. Stay focused, stay efficient, and let the shortcuts guide you to success.